Welcome to our step by step guide for using your text messaging platform within your Primarysite Website.
This document will help you achieve all these things in an easy step by step process. If you have any questions, please get in touch.
Before we look at setting up an event within the booking system, you must firstly make sure the data you are using is correct within the MIS system used in school.
The next few paragraphs will talk about your school contact data and making sure this is correct. If you have read the ‘how to manage your school contacts’ guide.
How to send Text Messages and Settings
Once your data is in place you can then begin to use your text messaging system. To do this, you will need to go to the text messaging system itself located in the ‘Communication’ tab and titled ‘Text Messaging’.
You will then be directed to the ‘send text message’ screen.
Firstly, you will need to select the recipients that your text message is being sent to. This could be an individual, a class, a group, a year or all contacts (if your Contacts area is not yet populated, please see above information or you can review our managing contacts user guide).
Once you have selected the recipients of your text message, they will appear in the ‘your recipients’ area on the right hand side.
Should you need to remove individuals from here, select the red circle button next to their name. Should you wish to start again, you can select the yellow ‘clear list’ button above the ‘your recipients’ box, this will remove all the selected contacts from the box.
You are now ready to create your text message by typing into the ‘message’ area. Please note there is a 160-character limit on messages and some special characters are not allowed. You can view which characters can be included in the message by clicking on the yellow question mark circle above the message box.
You must remember to type your message in one line, not using the enter key to split out messages. This will be classed as a special character and the text will not send.
Once you are happy with your message and checked that all the recipients required have been selected, you will need to click the yellow ‘send (XX credit)’ button. You will then be redirected to the delivery report screen under the sent messages area, this will confirm the delivery status of your texts.
As default, a text message received will not show from the school but from Primarysite, this can be changed in the ‘settings’ tab of your text messaging area.
You have the option to add your ‘from name’ in the above free text field. This will be the name that will appear on the recipient’s phone when the text is received.
How to view delivery reports
Once you have sent your text message, you will instantly be directed to the delivery report for that message. When a message has sent you will see the message circle appear in the below amber colour.
This will update to reflect messages received, sent and failed using the colour categories inside the circle. The below screen shot shows that the message sent, has been received.
You can also access delivery reports for past messages by going to the text messages area under the communication tab and selecting the ‘sent messages’ area.
In here you will see a list of sent messages, their status, number of texts sent, last updated and who sent the message. If you then click one of the messages, you will be taken into the delivery report itself as shown above.
How to add preset messages
In the ‘send text message’ area, you will see the option to add preset messages. This could be useful if you have certain information you need to send out to parents each week/termly. An example of this could be advising of non-uniform days.
To add preset messages, you will need to select the blue ‘manage preset messages’ link next to the message area.
You will then be directed to a new screen, where you can type in your message. The 160-character limit also remains in place here and some special characters will not be allowed. Once you are happy with your message, click the yellow ‘add’ button.
Your preset messages, once added, will appear in list format in the ‘preset messages’ area. You can edit any of these messages at any point by clicking on the message. This will take you back to the text area to edit it. You can also delete messages by clicking the tick box on the right of the message and then clicking the ‘delete selected preset messages’ button.
To then use a preset message, you will simply need to select the message in question from the ‘your message’ drop down box in the ‘send text message’ area.
Available Credits
Your Primarysite website will come with 1000 free credits for you to test out the text messaging system.
You will see how many available credits you have in the blue circle located in the top right corner of the text messaging area.
Each text sent to each contact is classed as 1 credit, your overall total will decrease each time you send a message to reflect the amount available.
You will also have the option to purchase further credits, should you wish to continue using the system. These can be purchased through your website directly, by going into the text messages area and selecting the ‘credits’ tab. You will then see a list of all available bundles for purchase.
Please note if you are a Gold or Gold+ customer, you are entitled to discount on any text bundles. Please give us a call on 01636 616630 to discuss this further.
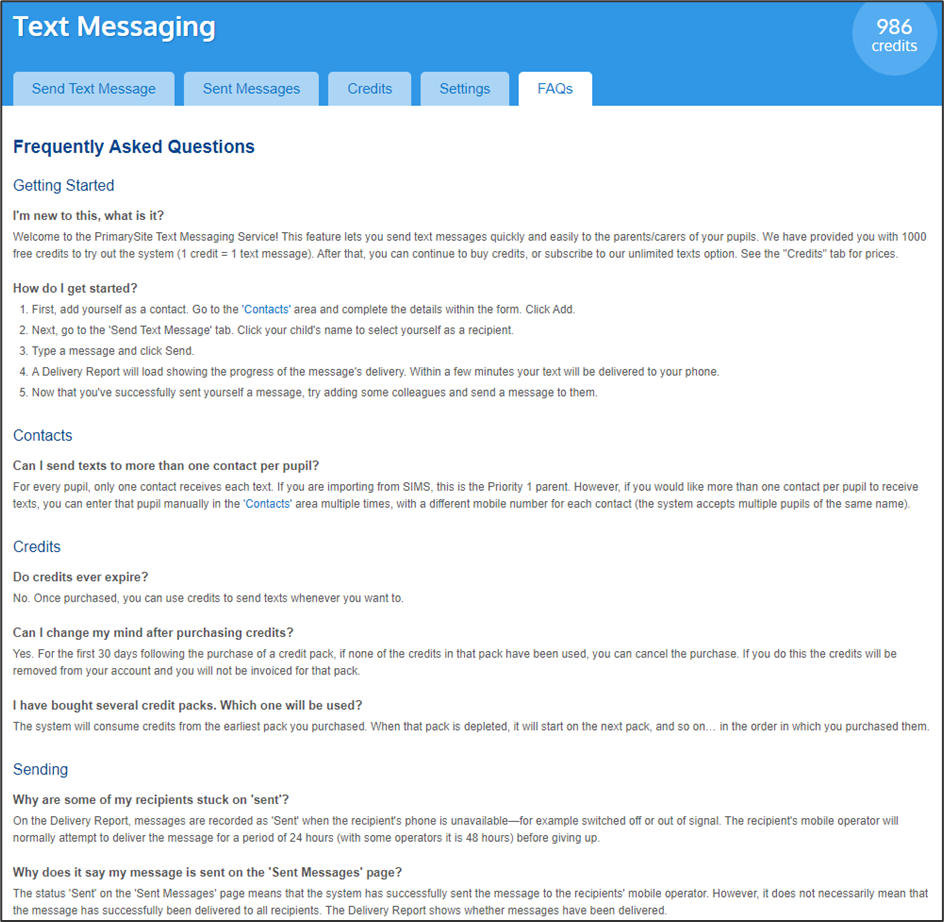
Questions that have been answered?
Please see the below for the FAQ’s tab, for the most common questions we are asked:

Updated